What to Put Under Inflatable Swimming Pools: Every Option Tested & Ranked
Gravel? Foam tiles? A tarp? The material under your pool matters more than most people realize — get it wrong and you risk punctures, instability, and a ruined lawn. This guide covers every realistic option, when to use each one, and which combination delivers the best results.
Why What You Put Under an Inflatable Pool Matters More Than You Think
Every decision about your inflatable pool — which model you buy, how much water to add, how often to treat it — ultimately rests on one thing: what is underneath it. That sounds dramatic until you realize a single sharp pebble, left undetected under three inches of vinyl, can transform a perfect pool day into an emergency.
The base layer does five jobs simultaneously. It protects the liner from abrasion and punctures caused by ground debris. It provides cushioning so the pool floor doesn’t harden uncomfortably under foot traffic. It creates thermal insulation, slowing the rate at which cold ground leaches heat from your water. It stabilizes the pool’s position so it doesn’t creep or shift during use. And it protects whatever surface is underneath — your grass, pavers, or deck — from prolonged moisture damage and pressure load.
Skip this step and you are not just risking a flat pool. You are risking mold growth on a killed lawn patch, slippage injuries on wet surfaces, and premature deterioration of a liner that might otherwise last several seasons. Whether you’ve already found your favorite model in our roundup of the best inflatable swimming pools, or you’re still deciding between the best options for adults, getting the base right comes before anything else.
All Base Materials at a Glance
There are half a dozen materials that regularly get recommended for pool bases, ranging from purpose-built pool pads to improvised solutions like old carpet. Before diving deep into each one, here is a fast-reference comparison so you can see how they stack up side by side.
| Material | Cost Range | Puncture Protection | Comfort | Insulation | Best For |
|---|---|---|---|---|---|
| Foam Interlocking Tiles Top Pick | $30–$120 | ⭐⭐⭐⭐⭐ | ⭐⭐⭐⭐⭐ | ⭐⭐⭐⭐ | Most surfaces, kids’ pools |
| Pool Ground Cloth / Pad | $20–$80 | ⭐⭐⭐⭐ | ⭐⭐⭐ | ⭐⭐ | Budget-conscious, packable |
| Tarp (heavy duty) | $8–$35 | ⭐⭐⭐ | ⭐⭐ | ⭐ | Emergency / temporary use |
| Compacted Sand Bed | $15–$60 | ⭐⭐⭐⭐⭐ | ⭐⭐⭐⭐ | ⭐⭐⭐ | Permanent / semi-permanent |
| Rubber Gym Mat | $40–$150 | ⭐⭐⭐⭐ | ⭐⭐⭐⭐ | ⭐⭐⭐ | Hard paved surfaces |
| Carpet / Rugs | — | ⭐ | ⭐⭐ | ⭐⭐ | ❌ Not recommended |
Foam Tiles
Best all-rounder. EVA foam cushions, insulates, and blocks debris. Easy to cut to size.
Pool Ground Cloth
Purpose-designed woven protection. Lightweight and packs away easily off-season.
Heavy-Duty Tarp
Budget option. Works in a pinch, but watch for edge moisture pooling and slippage.
Sand Bed
Premium long-term solution. Takes work to set up but delivers unmatched comfort.
Rubber Mat
Excellent on concrete or pavers. Heavy and hard to reposition, but extremely durable.
Carpet / Rug
Traps moisture, harbors mold, provides poor puncture protection. Avoid entirely.

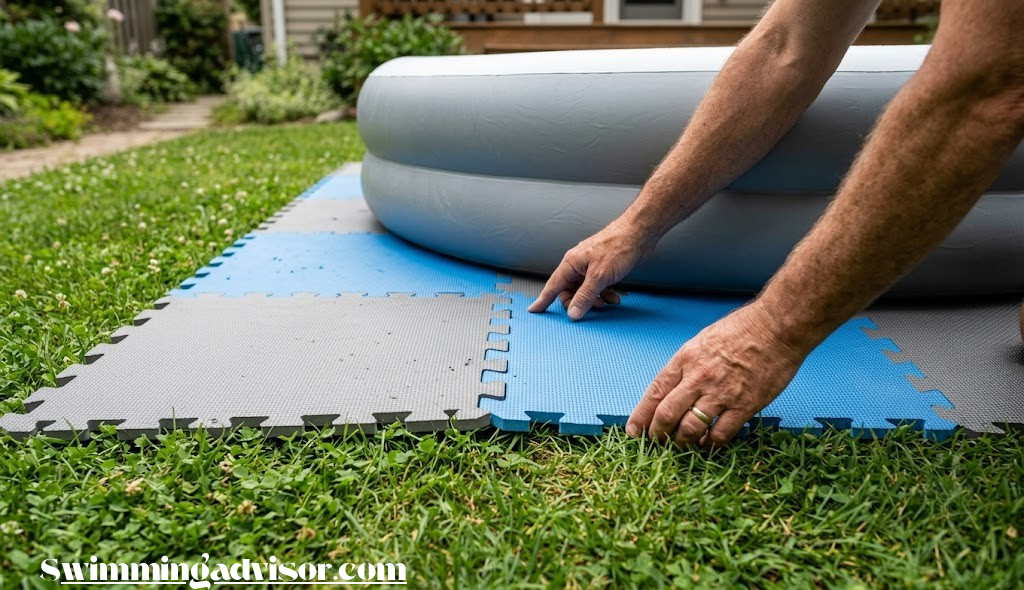
Foam Interlocking Floor Tiles (3/8″ EVA, 6-Pack)
Top-rated cushion tiles that cut to any shape, resist moisture, and protect your liner all season.
View on Amazon →Foam Interlocking Tiles: The All-Around Champion
If you asked a pool installer what to put under an inflatable swimming pool on almost any surface, there is a good chance they would say foam interlocking tiles without much hesitation. These puzzle-style EVA (ethylene-vinyl acetate) foam tiles have become the go-to choice for backyard pools, and for very good reason.
The foam absorbs the micro-vibrations and abrasion that happen every time someone steps on the pool floor, preventing that repetitive friction from slowly degrading the vinyl liner from below. They also create a measurable layer of thermal insulation — not enough to heat your pool on its own, but enough to slow the overnight temperature drop. If you’re already curious about how to heat inflatable swimming pools naturally, combining foam tiles with a pool cover can make a noticeable difference.
Choosing the Right Foam Tile Thickness
Thickness is the most misunderstood variable. Going thicker is not automatically better:
- 3/8 inch (9–10mm): Best for large pools where you want maximum coverage area per dollar. Slightly less cushion but still effective on grass or soft ground.
- 1/2 inch (12–13mm): The sweet spot for most inflatable pools. Enough cushion to feel soft underfoot, thin enough to remain flat under water load.
- 5/8 inch (16mm): Premium thickness, excellent for concrete or hard patio surfaces. Can shift slightly during filling on loose ground.
How to Cover a Round Pool with Square Tiles
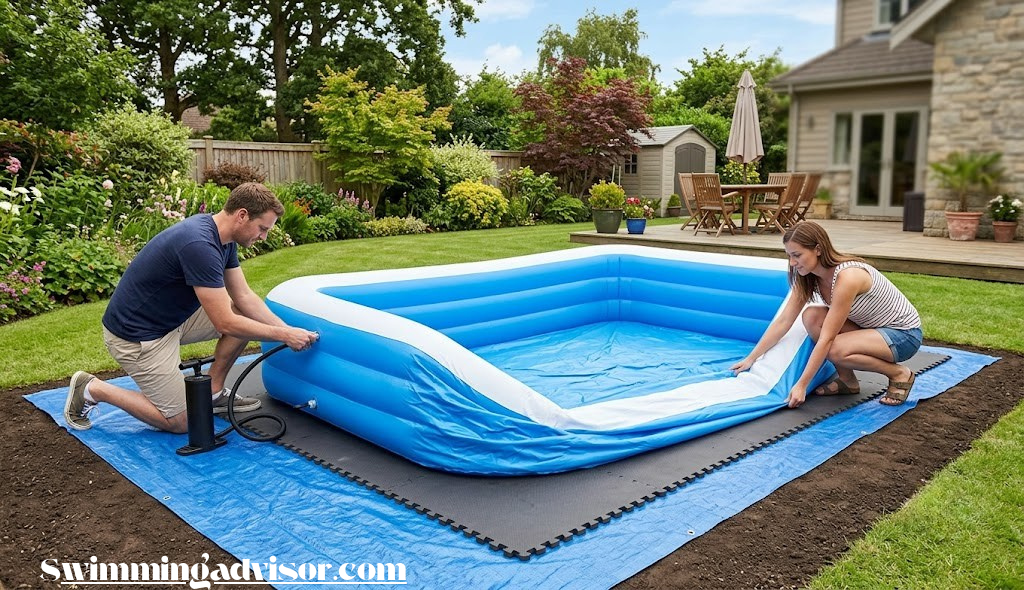
Most foam tiles are sold in 12″×12″ or 24″×24″ squares, which creates a challenge for round pools. The practical approach is to lay the tiles in a square grid pattern that covers the pool’s full diameter, then trim the outer-edge tiles to follow the pool’s circular footprint using a sharp utility knife or box cutter. Take your time on the cuts — jagged edges will shift and expose gaps over time.
For a 10-foot round pool (the most common size for families), you’ll need approximately 80–85 square feet of tiles, so buy 10–15% extra to account for trimming waste.
✓ Pros
- Excellent puncture protection
- Comfortable underfoot even after hours of use
- Waterproof — won’t rot or harbor mold
- Modular — easy to extend or reconfigure
- Can be stored flat and reused year after year
- Works on any surface
✗ Cons
- Costs more upfront than a tarp or ground cloth
- Requires cutting for round pool shapes
- Cheap tiles can separate at puzzle joints under water pressure
- Floats if water gets underneath (use edge trim pieces)

Bestway Flowclear Pool Ground Cloth
Purpose-made woven pool pad in multiple sizes. Folds flat for off-season storage and fits most popular round inflatable pools.
View on Amazon →Pool Ground Cloths and Pool Pads: Purpose-Built Protection
A pool ground cloth — sometimes called a pool pad or pool mat — is exactly what the name suggests: a heavy woven or non-woven fabric sheet designed to lie between the ground and the pool liner. Unlike tarps, which are generic and slippery, ground cloths are engineered specifically for pool use. They come sized to match common pool diameters, which means no cutting, no guessing, and no accidental overhang trapping water at the edges.
The woven construction is key. Most quality pool cloths use a polypropylene or polyester weave that is tough enough to prevent debris intrusion but permeable enough to allow minimal moisture transfer — which means they won’t trap standing water underneath the way a solid tarp does. Some higher-end versions are also laminated with a moisture barrier on the underside to protect the lawn from the pool’s weight and shade damage.
Ground Cloth vs. Foam Tiles: When to Choose Each
| Scenario | Ground Cloth | Foam Tiles |
|---|---|---|
| Budget under $30 | ✅ Better choice | ❌ Limited options |
| Pool moved often / seasonal | ✅ Folds compactly | ⚠️ Bulkier to store |
| Kids’ pool with heavy foot traffic | ⚠️ Adequate | ✅ Much more comfortable |
| Placed on rough concrete | ⚠️ Thin — add extra layer | ✅ Excellent |
| Clean, graded lawn | ✅ Ideal | ✅ Also good |
| Permanent seasonal install | ⚠️ May degrade in UV | ✅ Longer lifespan |
Ground cloths are a smart, low-fuss solution for families with inflatable pools designed for kids that get set up and torn down frequently. They fold to roughly the size of a folded tarp, making off-season storage painless.
✓ Pros
- Sold in pool-matched sizes (no cutting)
- Lightweight and easy to store
- Better puncture protection than a bare tarp
- Often UV-stabilized for outdoor use
- More affordable than foam tiles
✗ Cons
- Less cushioning than foam tiles
- Thinner versions tear on very rough ground
- Minimal insulation value
- Sizing is pool-specific — wrong size won’t cover fully
Tarps and Heavy-Duty Poly Sheets: The Budget Fallback
Before purpose-built pool pads became widely available, the humble tarp was the default answer to “what do I put under my pool?” Millions of pools have sat on tarps without disaster, so it would be unfair to dismiss them entirely. But tarps come with real drawbacks that more targeted materials avoid — and understanding those drawbacks lets you use one intelligently if budget is a constraint.
The Right Way to Use a Tarp Under a Pool
If a tarp is your choice, thickness matters enormously. A flimsy 3-mil poly tarp from the hardware store will tear within days under the weight of a full pool. You want a minimum of 6-mil polyethylene, and for any pool over 10 feet in diameter, aim for 8–10 mil. Heavy-duty canvas tarps also work well but add cost that narrows the gap between them and a purpose-made pool pad.
The single most important rule with tarps: size down, not up. A tarp that extends beyond the pool’s footprint creates a lip that channels rainwater, sprinkler overspray, and splash-out underneath the pool rather than away from it. Over days, this creates a swampy, algae-prone microenvironment that is far worse than bare grass. Cut or fold your tarp to sit 2–4 inches inside the pool’s base ring on all sides.
✓ Pros
- Very low cost ($8–$35)
- Available at every hardware store
- Provides basic abrasion protection
- Works as temporary solution
✗ Cons
- Slippery and potentially dangerous when wet
- No cushioning — hard surfaces feel just as hard
- Traps water if oversized (creates mold risk)
- UV degradation causes crumbling within 1–2 seasons
- No thermal benefit

Heavy-Duty 8-mil Poly Tarp (Multiple Sizes)
Reinforced grommets, tear-resistant weave. The minimum you should use if a tarp is your only option.
View on Amazon →Sand Beds: The Gold Standard for Permanent Setups
Ask anyone who has owned a large above-ground pool — the kind you keep in the same spot all summer, every summer — and they’ll likely tell you a compacted sand bed is the best base they’ve ever used. The same principle applies to large inflatable pools, particularly the inflatable pools sized for adults that can reach 12–18 feet in diameter.
A properly prepared sand bed is debris-free (because you put it there yourself), naturally smooth, moldable to your exact pool shape, and gentle enough that the liner literally sinks into it slightly under water pressure — conforming around the pool’s base rather than creating pressure points. The feel underfoot is also noticeably softer than any foam tile.
What Type of Sand to Use
The critical detail almost every guide gets wrong is the type of sand. Not all sand is equal:
- Builder’s sand (sharp sand): ✅ Best choice. Compacts firmly, drains well, and creates a stable base that doesn’t shift under load.
- Mason sand: ✅ Also excellent — finer grain, very smooth, common choice for pool pads.
- Play sand / beach sand: ❌ Too fine. Shifts and migrates under pressure, creating uneven spots that stress the liner unevenly.
- Crushed limestone / decomposed granite: ❌ Sharp edges in the material can puncture liners even through a thick layer.
Depth is another key variable. Two to three inches of compacted sand is the target. Less than two inches and the base will compress under the pool’s weight within a few days, reducing its protective value. More than three inches on unlevel ground becomes difficult to compact properly and may create soft spots that shift under pressure.
Installing a Sand Bed: Key Steps
Before you begin any ground preparation, make sure you’ve already read our dedicated guide on how to level ground for inflatable swimming pools — leveling always comes before laying the base material, and getting that step right is what determines whether your pool remains stable all season.
✓ Pros
- Unmatched comfort and debris-free surface
- Long-lasting — the same bed can be used for years
- Naturally molds to pool base shape
- Good drainage when properly installed
✗ Cons
- Significant upfront labor
- Not practical for pools that move frequently
- Requires a permanent or semi-permanent commitment
- Sand can spread if border fails
Rubber Flooring and Gym Mats: Best for Concrete and Pavers
Rubber gym mats — the kind found in home weight rooms and CrossFit gyms — have quietly become one of the best options for inflatable pools placed on hard surfaces. The dense rubber absorbs the abrasion that concrete and textured pavers would otherwise impose on the vinyl liner, adds meaningful slip resistance around the pool perimeter, and provides a stable, non-shifting base that holds its position even when the pool is fully loaded with water.
For pools placed on concrete patios, asphalt driveways, or hard-packed gravel, rubber is arguably the single best protective layer available. The material is naturally waterproof, UV-resistant, and handles the ongoing wet-dry cycle of outdoor use far better than foam tiles, which can deteriorate faster in sustained UV exposure.
Interlocking Rubber vs. Rubber Roll Mats
Interlocking rubber tiles (similar in configuration to foam tiles but much heavier) are easiest to size correctly. Rubber roll mats offer a seamless surface but are very heavy, making them difficult to reposition and store. For most homeowners, interlocking rubber tiles in 2-foot squares hit the sweet spot of coverage, weight, and practicality.
✓ Pros
- Excellent on concrete and paved surfaces
- Long lifespan — handles UV and weather well
- Slip-resistant surface reduces injury risk
- Very durable under pool water weight
- Easy to hose down and sanitize
✗ Cons
- Heavy and difficult to move alone
- More expensive than foam or ground cloth
- Not ideal on soft ground (sinks and shifts)
- Rubber odor when new (fades over time)

BalanceFrom Puzzle Exercise Mat (3/4″ Rubber Tiles)
Premium interlocking rubber tiles that stand up to outdoor use. Perfect under inflatable pools on hard patio surfaces.
View on Amazon →Best Base Material by Surface Type
One of the most practical ways to choose your base layer is to start with the surface you already have, then work backward to the right material. Here is a direct surface-by-surface guide.
On Grass
Grass is the most common placement surface and generally the easiest to work with after leveling. Clear the area of sticks, rocks, toys, and anything that could press into the liner. A ground cloth or foam tiles both work well here. Note that any pool left in the same spot for more than a few days will kill the grass beneath it by blocking sunlight. If preserving your lawn matters, move the pool periodically or choose a paved surface. You can read more about this in our companion guide on preparing the ideal pool base.
On Concrete or Paved Surfaces
Concrete is actually ideal from a stability standpoint — it’s flat, hard, and doesn’t shift. The only issue is abrasion. Even slightly textured concrete will slowly sand through the bottom of a vinyl liner during a single season. Rubber gym tiles or thick foam tiles (5/8 inch or more) are the right solution here. Never place an inflatable pool directly on bare concrete without a protective layer.
On Gravel
Pea gravel and crushed stone require extra care. Even small gravel pieces are essentially tiny sharp objects sitting right against the liner. You’ll need to double-layer your protection: compress and flatten the gravel as much as possible, add a thick ground cloth to bridge over any remaining irregularities, then add foam tiles on top of that. On rough gravel, even a small pool will develop slow micro-punctures within weeks without this extra protection.
On a Deck
This is the scenario requiring the most caution. The structural load of a full inflatable pool is enormous — water weighs 8.34 lbs per gallon, and a 10-foot, 24-inch-deep round pool can hold 1,000 gallons or more. That is 8,000+ pounds on your deck. Residential decks are rarely engineered for this. If you must use a deck, limit yourself to small wading pools under 6 feet diameter, and even then, place the pool near the structural supports, not in the center span. Always consult a structural professional first.
And of course, once you’ve confirmed your surface and laid your base, you’ll want to know exactly how much water goes in inflatable swimming pools to avoid overfilling.
What to Avoid Completely Under Your Inflatable Pool
Just as important as knowing what works is knowing what to eliminate from consideration entirely. Some materials that seem intuitive actually create risks that outweigh their apparent benefits.
Old Carpet or Rugs
This is probably the most common mistake made by first-time inflatable pool owners. Carpet retains moisture for extended periods — often days after the pool is removed. That trapped moisture, combined with the warmth generated by a pool sitting in sunlight, creates ideal conditions for mold, mildew, and bacterial growth. The smell alone after a week under a pool is enough to confirm this. Carpet fibers also compress under load, allowing the underlying debris they were supposed to block to press upward into the liner. Skip carpet entirely.
Bare Dirt or Mud
Bare earth has hidden hazards at every turn — roots, rocks, worm holes, and insect tunnels that shift under weight and create uneven pressure points against the liner. Wet dirt also migrates into the water supply at the liner seams over time, clouding your water. Always put something between bare earth and your pool.
Bubble Wrap or Thin Plastic Sheeting
Bubble wrap seems like a clever improvisation — cushioning and a moisture barrier at once. In practice, the bubbles collapse within minutes under the weight of a filled pool, leaving you with flat plastic that offers no more protection than a produce bag. Thin plastic sheeting tears almost immediately on any rough surface.
Newspaper or Cardboard
Some old guides suggest cardboard as a free base material. Cardboard disintegrates when wet, often within the first 24 hours. By day two you have a soggy, mold-prone paste under your pool that is worse than bare ground. Newspaper has the same problem at an even faster rate.
Wobbly Wooden Pallets
Pallets are uneven, have gaps between planks, and splinter — creating extremely sharp edges that can puncture a pool liner from below under water pressure. They are also not stable under shifting loads. Never use pallets as a pool base.
Setting Up Your Base Layer: A Complete Walkthrough
Having the right material is only half the job. How you lay it down matters just as much. These steps apply regardless of which base material you choose.
Once your pool is set up and filled, maintaining the water quality becomes the next priority. Check our resources on the chemicals needed for inflatable swimming pools and how to keep algae out of inflatable swimming pools to stay ahead of maintenance needs.
Cost Comparison: What You’ll Actually Spend
The cost to properly protect your inflatable pool’s base varies significantly depending on pool size and your material choice. The numbers below assume a mid-size 10-foot round pool, which is the most common size for family use. Coverage area is approximately 79 square feet.
| Material | Coverage Needed | Cost for 10ft Pool | Cost per Season | Reusability |
|---|---|---|---|---|
| Foam Tiles (3/8″) | ~90 sq ft | $45–$70 | $10–$15 | 4–6 seasons |
| Foam Tiles (1/2″) | ~90 sq ft | $65–$110 | $15–$22 | 4–6 seasons |
| Pool Ground Cloth | Matched size | $25–$55 | $12–$18 | 2–4 seasons |
| Heavy-Duty Tarp (8-mil) | ~80 sq ft | $18–$35 | $18–$35 | 1–2 seasons |
| Sand Bed + Ground Cloth | Filled area | $55–$90 (first year) | $5–$12 | 5–10 seasons |
| Rubber Tiles (3/4″) | ~90 sq ft | $120–$200 | $15–$25 | 7–10 seasons |
When viewed as a cost-per-season calculation, foam tiles and sand beds deliver the best long-term value despite higher upfront costs. The heavy-duty tarp seems cheapest initially, but replacing it every one to two seasons makes it more expensive over a five-year period than either foam or sand.

Alauppin Pool Pad – Round Ground Cloth (Multiple Sizes)
UV-resistant woven pool pad in matched round sizes for 8ft, 10ft, 12ft, and 15ft inflatable pools. Rolls flat for storage.
View on Amazon →Pro Tips for Season-Long Base Protection
Getting the base right at setup is the major step, but a few ongoing habits will keep your pool and its liner performing well from the first fill to the last drain of the season.
Inspect Underneath at Every Refill
Whenever you drain your pool for cleaning or to move it to a fresh patch of lawn, take the opportunity to lift your base material and inspect the ground underneath. Look for new debris that may have blown in, any signs of mold or algae growth on the underside of the base layer, and any spots where the ground has become uneven or settled. This five-minute inspection prevents most mid-season punctures. You’ll also want to clean the pool itself at these moments — our guide on how to clean inflatable swimming pools without a pump makes this easy.
Treat the Ground Before Laying Base Material
On areas with a history of algae or mold, apply a diluted bleach solution (1 part bleach to 10 parts water) to the bare ground and let it dry completely before laying your base material. This kills mold spores and organic material at the soil level, giving you a much cleaner starting surface for the season.
Use a Pool Cover When Not In Use
A pool cover reduces evaporation, keeps out debris, and reduces the UV load on both the liner and the base material. Less debris in the water means less settling through the liner to the base, and a cooler pool in off-hours means less thermal expansion stress on the vinyl seams. Browse the best covers for inflatable swimming pools to find options sized for your model.
Consider Dog and Pet Use Separately
If you’re planning to let dogs or other pets use the pool, the base layer equation changes. Pet claws can damage both the liner and foam tile surfaces. Thicker rubber mats are the most claw-resistant option, and you’ll want to check our specific guide on whether inflatable swimming pools are safe for dogs and how to set them up properly. Similarly, if you’re comparing pool shapes for the whole family, our breakdown of rectangular vs. round inflatable swimming pools covers how shape affects base prep requirements.
Store Base Materials Properly Off-Season
Foam tiles, ground cloths, and tarps all benefit from dry, indoor storage during winter months. Foam tiles stored in a damp garage will develop mold on the puzzle-joint faces. Ground cloths folded with moisture trapped inside will develop mildew. Rinse, dry completely in the sun for at least two hours, then store flat or rolled in a sealed container or bag.
Keep a Pool Cleaning and Draining Routine
The cleaner your water, the less chemical and organic material settles against the liner base, and the less contamination transfers to your base layer over the season. Develop a weekly maintenance schedule and use the right pool chemicals for inflatable pool use. When it’s time for a complete seasonal drain, knowing how to drain inflatable swimming pools quickly makes the whole process faster and easier.
For families who invest in a quality pool vacuum, you’ll find the pool stays measurably cleaner longer — browse the best vacuums for inflatable swimming pools for appropriately sized options that won’t stress the liner during cleaning.
Frequently Asked Questions
Conclusion: Invest Two Hours Now, Save a Season Later
The question of what to put under an inflatable swimming pool might seem like a minor logistics detail, but it’s the kind of detail that separates a pool that lasts four seasons from one that springs a leak by the end of its first summer. Every material choice described in this guide protects the same thing: the vinyl liner, which is simultaneously the most functional and most vulnerable part of any inflatable pool.
For most families, the answer is foam interlocking EVA tiles. They provide the best combination of protection, comfort, thermal insulation, and reusability at a cost that pays for itself in the first season. On hard surfaces like concrete patios, upgrade to rubber gym tiles. For a budget setup on a clean, well-maintained lawn, a purpose-made ground cloth does the job well. If you’re committing a permanent seasonal spot, a compacted sand bed is worth the one-time labor investment.
Whatever material you choose, remember: level the ground first, clear all debris, size your base to match the pool footprint without excess overhang, and do a barefoot final inspection before placing the pool. Those steps cost you nothing but time, and they’re the difference between a problem-free pool season and an afternoon spent trying to locate a slow leak.
If you’re still selecting your pool, our hub on the best inflatable swimming pools is the best place to start — then come back here once you’ve found your model to dial in the base preparation before your first fill. For families looking at larger, more permanent options, our roundup of best inflatable swimming pools for adults includes models that particularly benefit from the sand-bed approach described in this guide.
Ready to Set Up Your Pool the Right Way?
Explore our full collection of inflatable pool guides — from choosing the right model to keeping the water clean all season long.
Browse Top Inflatable Pool Picks →
Complete Pool Base Kit: Foam Tiles + Ground Cloth Combo
The professional approach: foam tiles for cushion, ground cloth over the top for liner protection. Two-layer defense against punctures and debris.
Shop Base Kits on Amazon →