How to Clean Inflatable Swimming Pools Without a Pump
A complete, hands-on system for keeping a blow-up pool clear, sanitary, and swim-ready using nothing but manual tools, a garden hose, and a little routine.
No motor, no hoses to an electrical outlet, no filter cartridges — just a routine you can run entirely by hand.
Why Pump-Free Cleaning Actually Works
Most pool-care advice assumes you have a pump pushing water through a filter twenty-four hours a day. Inflatable pools usually don’t work that way, and a lot of owners feel like they’re already behind before they’ve even filled the thing up. That’s the wrong way to think about it. A pump doesn’t clean water — it moves water past a filter, and the filter is what actually traps debris. If you can move debris out of the water by other means, and keep new debris from getting in, you’ve replicated the two jobs a pump does, just with your hands instead of a motor.
Inflatable and kiddie pools also hold far less water than an in-ground pool, which works in your favor. A 10-foot round inflatable might hold somewhere in the neighborhood of 1,000 gallons, while a small kiddie pool might hold less than 100. Smaller volumes mean contamination is diluted less, but they also mean manual intervention — skimming, brushing, partial draining — has an outsized effect almost immediately. You’re not fighting a losing battle against a giant body of water with hand tools. You’re maintaining something closer to a very large bathtub.
The core idea: water goes bad without a pump for two reasons — debris accumulates, and there’s no chemical or mechanical process keeping bacteria and algae from establishing themselves. Solve both, and a filterless pool can stay swimmable for well over a week, sometimes two, depending on use and weather.
It helps to break down exactly what a pump-and-filter system is doing mechanically, because every manual method in this guide maps directly onto one of those jobs. A pump’s motor draws water in through a skimmer opening, pushes it through a filter element — sand, cartridge, or fiber, depending on the system — and returns the cleaned water to the pool. That’s really just three steps: collect water that’s near the surface, strain debris out of it, and put it back. A handheld skimmer net collects debris before it can sink, exactly the way a skimmer line does. A pool brush dislodges material stuck to surfaces so it can be physically removed, similar to how a filter catches what’s already suspended. And a siphon or handheld vacuum pulls water (and whatever’s floating in its path) out of the system entirely, which is actually a more thorough version of filtration since the debris doesn’t go back in at all.
There’s also a psychological hurdle worth naming directly: a lot of people assume that because pumps run continuously, manual cleaning has to happen continuously too, or it’s somehow “not working.” That’s not how it plays out in practice. A pump running around the clock is mostly handling a slow, steady trickle of fine particulate and maintaining gentle circulation so chemicals don’t pool in one spot. Manual methods don’t need to mimic that constant trickle — they need to catch up periodically, in short, deliberate sessions, and prevent extreme situations (a thick mosquito larvae mat, a green tint, a slick liner) from establishing in between those sessions. Five minutes of focused skimming and brushing once or twice a day accomplishes almost everything a quiet, well-maintained pump would, just compressed into a routine instead of spread continuously across 24 hours.
This guide walks through every manual method that fills the gap a pump would otherwise leave: skimming and brushing routines, a garden-hose siphon vacuum you can build in minutes, handheld manual vacuums, chemical-free balancing tricks, safe ways to use chlorine without circulation equipment, and the decision points for when draining and refilling is simply the better call. If your pool came with a pump that broke, or you bought one that never had one to begin with, every section below applies the same way.
What You’ll Need
None of this requires specialized pool equipment. Most of these items are either already in a garage or cost very little. Here’s the full kit, organized by what each tool actually does for you.
| Tool | Job It Does | Typical Cost |
|---|---|---|
| Handheld skimmer net | Removes floating leaves, bugs, grass clippings | $5–$12 |
| Pool brush (handheld) | Loosens algae film and dirt on walls and floor | $8–$18 |
| Garden hose | Builds a manual siphon vacuum, refills pool | Usually on hand |
| Battery-powered manual vacuum | Lifts settled debris off the floor without a pump line | $25–$45 |
| Floating chlorine dispenser + tablets | Releases sanitizer slowly without a feeder pump | $8–$15 |
| Baking soda | Buffers pH, mild algae deterrent | $1–$3 |
| Pool test strips | Checks pH and chlorine levels | $6–$12 |
| Pool cover or tarp | Blocks debris and sunlight between uses | $10–$30 |

A skimmer net and brush combo handles 80% of manual pool cleaning on its own — it’s the single best first purchase if you’re starting from zero.
Check Price on AmazonYou don’t need all eight items on day one. A skimmer, a brush, and a garden hose will get you through most of a season. The vacuum and chlorine dispenser are upgrades worth adding once you know how much maintenance your specific pool actually needs, which depends heavily on tree cover, swimmer traffic, and local pollen.
What to look for in each tool
Not every skimmer net or brush is built the same way, and a few small differences matter more than the price tag suggests. A telescoping handle is worth the extra few dollars on almost any net or brush — it lets you reach the center of a larger pool from the edge without leaning over the water, and it adjusts down for smaller kiddie pools without becoming awkward to use. Mesh density on a skimmer net matters too: a fine mesh catches small debris like pollen and grass clippings, while a wider mesh lets water drain through faster but misses the smallest particles. For most backyard setups, a medium-density mesh strikes the right balance.
For brushes, look at the bristle material before anything else. Stiff nylon bristles work well on vinyl and PVC liners, which is what the overwhelming majority of inflatable pools are made from, but they can be too aggressive on some delicate inflatable materials if used with excessive pressure. A softer bristle, used with a bit more frequency, is the safer default if you’re not certain what your liner is rated for.
Garden hoses don’t need to be anything special for this guide’s purposes, but a hose with a tight-sealing female end makes building a siphon noticeably easier, since a loose or worn fitting lets air sneak back into the line mid-siphon. If your existing hose has a worn end, a two-dollar replacement fitting solves more siphon problems than people expect.
When it comes to handheld vacuums, runtime and chamber size trade off against each other. A unit with a longer runtime but a small chamber will need more pauses to empty and rinse; a unit with a larger chamber but shorter runtime might need recharging mid-clean on bigger pools. Reading a handful of real owner reviews before buying — specifically looking for mentions of how long a single charge lasts on a comparable pool size — saves a lot of trial and error.
The Skim & Brush Routine
This is the foundation everything else builds on. Done consistently, skimming and brushing alone can keep a small inflatable pool clear for a week or more without any other intervention. The principle is simple: debris is easiest to remove the moment it lands, before it has time to sink, break down, or feed algae.
What makes this routine so effective isn’t any single step — it’s the combination of catching debris early and disrupting the conditions algae and bacteria need to take hold. Left alone, organic material like leaves and grass clippings doesn’t just float harmlessly; it begins breaking down within hours, releasing nutrients into the water that algae spores feed on. A pool that looks perfectly clear on day one can develop a faint green tint by day four simply because nobody removed a handful of grass clippings that blew in on day two. Skimming interrupts that entire chain before it starts.
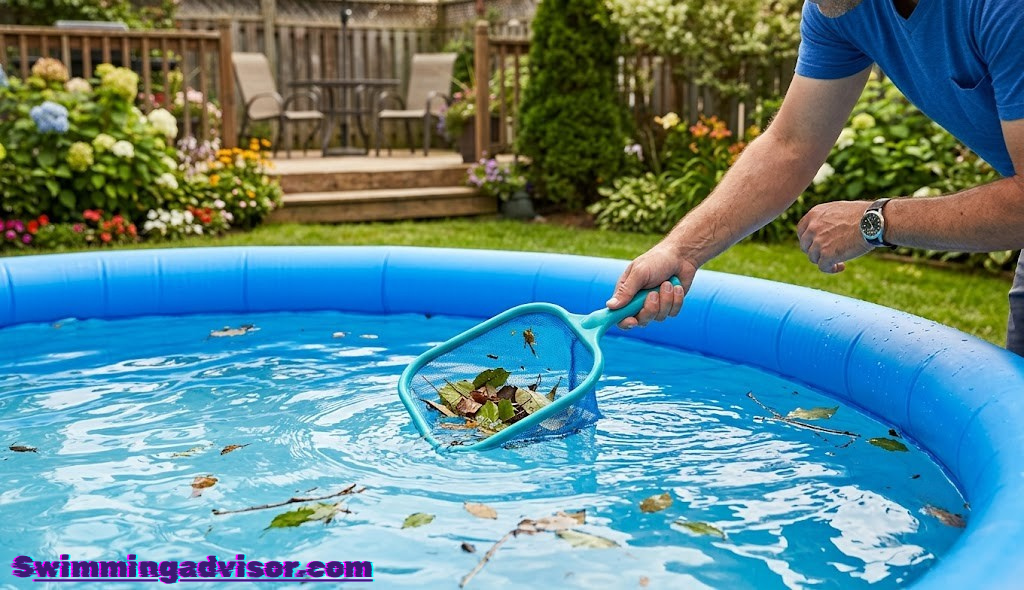
Skim the surface before anyone gets in
Every time before swimming — and once a day even when no one’s using the pool — pull a skimmer net across the entire surface in slow, overlapping passes. Leaves, insects, pollen, and grass clippings float for a while before they sink, so this is the cheapest moment to catch them.
Brush the walls and floor in overlapping arcs
Without circulation, a thin biofilm can form on the pool liner faster than you’d expect, especially in warm weather. A soft pool brush breaks this film up before it thickens into the slippery, slimy coating most owners associate with neglected pools. Work in long, overlapping strokes from the waterline down to the floor, paying extra attention to corners and folds in the liner where flow is naturally weakest.
Stir and re-skim before moving on
Brushing knocks settled particles back into suspension, which is the point — but it means there’s now a layer of cloudy water near the floor that a second skim pass can’t catch from the surface. Give it a few minutes to drift, then run the skimmer net along the bottom in shallow water, scooping underneath the loosened layer rather than just across the top.
Tip: run this entire routine in under five minutes once it’s habitual. Most owners report it becomes a quick pre-swim ritual rather than a chore once the tools are within reach of the pool.
Tuning frequency to your actual conditions
The schedule above assumes typical conditions, but yours might not be typical. A pool set up under even partial tree cover will need skimming closer to twice a day rather than once, since falling debris doesn’t pause to fit a routine. Pools used by multiple children for hours at a stretch accumulate sunscreen and body oils faster, which calls for more frequent brushing even if the water still looks visually clear, since oils tend to show up as a feel rather than a sight. On the other end, a pool kept covered between uses in a relatively debris-free yard might comfortably stretch to brushing every third day instead of every other day.
A simple way to calibrate without overthinking it: run the full skim-and-brush routine daily for the first week of a new setup, then watch how quickly debris reaccumulates and the liner starts to feel different underfoot. That observation period tells you more about your specific yard, climate, and usage pattern than any generic schedule could.
Want a head start on choosing the actual pool before worrying about maintenance? Our guide to the best inflatable swimming pools covers which liner materials hold up best to frequent brushing, which matters more than people expect once you’re cleaning by hand.
Build a Garden Hose Siphon Vacuum
This is the closest thing to a real pool vacuum you can build with zero electricity and zero special equipment. It uses gravity and water pressure instead of a motor, and it’s genuinely effective at pulling fine sediment off the floor that a skimmer net simply can’t reach.
Fill the hose completely with water
Submerge the entire garden hose in the pool until every section is full of water and no air pockets remain. Air in the line is the single biggest reason a siphon fails to start, so take the extra minute to get this right.
Seal one end, lower the other below the pool’s water line
With your thumb or a cap, seal one end of the hose while it’s still submerged. Lift that sealed end out of the pool and lower it to a spot outside the pool that sits lower than the water surface — a slope, a drain, or simply ground level if your pool is elevated even slightly on a stand or deck. The height difference is what drives the siphon.
Release the seal and guide the intake along the floor
Once you unseal the outdoor end, gravity pulls water — and any sediment in its path — through the hose continuously. Keep the submerged end an inch or two above the floor and sweep it slowly across debris piles, the same way you’d run a real vacuum head. Stop the flow at any time by sealing the outdoor end again or lifting it above the pool’s water line.
Heads up: a siphon removes water along with debris, so you’ll need to top the pool back up afterward. For pools without a drain plug, this same siphon trick — run for longer, with the outlet aimed at a hillside or drain — is also the easiest way to empty the pool entirely. More on that in how to drain inflatable pools quickly.

A dedicated siphon hose attachment seals more reliably than a bare hose end and makes this method nearly foolproof on the first try.
Check Price on AmazonUsing a Battery-Powered Manual Vacuum
If skimming, brushing, and siphoning feel like more hands-on work than you want, a small battery-powered handheld vacuum splits the difference. These units have a self-contained motor and debris bag, so they don’t connect to anything — no pump line, no outlet — but they still do mechanical suction work for you.
Charge it fully and attach the brush head
Most handheld pool vacuums run for somewhere between 30 and 60 minutes on a full charge, which is generally enough for a full cleaning pass on anything up to a large family-size inflatable. The brush head attachment helps agitate debris stuck to the liner at the same time it’s being suctioned away.
Work in slow, overlapping lanes across the floor
Submerge the unit and move it in straight, overlapping lanes the same way you’d mow a lawn — one pass beside the previous one, slow enough that the suction has time to lift settled grit before you move on. Rushing across the floor is the most common reason people feel like their vacuum “isn’t picking anything up.”
Empty and rinse the debris chamber between passes
Most handheld units have a small internal chamber or bag that fills up fast in a dirty pool. If suction noticeably weakens mid-clean, it’s almost always a full chamber rather than a dying battery. Pop it open, rinse it out, and keep going.
Pros
- Fastest of the three manual methods
- Doesn’t waste any pool water
- Good for daily light maintenance
Cons
- Upfront cost higher than a net or brush
- Needs charging between uses
- Small debris chamber needs frequent emptying
Chemical-Free Water Balancing
Plenty of inflatable pool owners — especially with kiddie pools used by young children — prefer to skip chlorine entirely and rely on draining frequency plus a couple of gentle additives. This isn’t a compromise so much as a different philosophy: instead of sanitizing water to extend its life, you accept a shorter life and just refresh it more often.
Baking soda is the most common chemical-free tool. A modest amount stirred into the water helps buffer pH swings, which on its own makes the water less hospitable to algae, since algae thrives more easily in water that’s drifted alkaline. It won’t disinfect bacteria the way chlorine does, but it measurably slows the speed at which water turns cloudy or develops that telltale slick film on the liner.
Pair baking soda with consistent skimming and a cover between uses, and many small pools can go three to five days chemical-free before the water needs replacing — longer in cooler weather, shorter in direct sun with heavy swimmer traffic.
If you’re set on staying chemical-free, lean harder into prevention: rinse swimmers off before they get in to remove sunscreen and sweat, keep the pool covered when not in use, and consider an oil-absorbing sponge specifically designed to pull sunscreen residue and body oils out of the water without any chemical reaction at all.
It’s worth being honest about the trade-off here, since a lot of guidance online glosses over it. Chemical-free water is genuinely lower-risk in terms of skin and eye irritation, which matters for households with very young children or anyone with sensitive skin. But “lower chemical risk” and “lower contamination risk” are not the same thing — without chlorine actively killing bacteria, a chemical-free pool that sits for several days in warm weather can develop bacterial counts that no amount of skimming will catch, since bacteria don’t float in clumps a net can see or remove. The honest takeaway is that chemical-free maintenance shifts the burden from chemical management to drain frequency. If you’re not willing to drain and refresh every two to three days in warm weather, a small amount of chlorine becomes the safer choice rather than the more convenient one.
Some owners land on a middle ground: skip chlorine for the first few days after a fresh fill, when contamination risk is lowest, then introduce a light dose only once the water has been in use for a few days and the household decides to extend its life rather than draining. This isn’t a formally recommended protocol, but it reflects how a lot of real households actually approach the decision in practice.
For a deeper look at what additives are actually necessary versus optional, see chemicals needed for inflatable swimming pools.
Using Chlorine Without a Pump
Chlorine doesn’t actually need a pump to work — it needs to be distributed through the water, which a pump normally helps with but isn’t strictly required for. A floating chlorine dispenser solves the distribution problem on its own: it holds a slow-dissolving tablet and drifts around the pool, releasing chlorine gradually as it bumps along the surface and current created by swimmers.
Most small to mid-size inflatable pools need far less chlorine than people expect. A single 3-inch tablet, or half of one in genuinely small pools, can hold a steady sanitizing level for roughly a week. Going overboard with chlorine in a small volume of standing water is a far more common mistake than under-dosing.
| Pool Size (approx.) | Suggested Chlorine | Test Frequency |
|---|---|---|
| Kiddie pool (under 100 gal) | Half of one 1″ tablet | Every 2–3 days |
| Medium pool (100–500 gal) | One 1″ tablet or half a 3″ tablet | Every 2 days |
| Large pool (500–1,500 gal) | One 3″ tablet | 2–3 times per week |
Use test strips to confirm free available chlorine sits in a safe range rather than guessing by smell or feel — both over- and under-chlorinated water can look identical at a glance. Manually swishing the floating dispenser around the pool once or twice a day, the same way you’d stir a drink, helps distribute the chlorine more evenly in the absence of pump-driven circulation.
Important: always remove the floating dispenser while anyone is actually swimming, then return it to the water afterward. This is standard practice regardless of whether a pump is present.
Don’t overlook pH
Chlorine and pH are linked in a way that’s easy to underestimate. Chlorine becomes dramatically less effective at killing bacteria and algae as pH drifts upward, which means a pool can have what looks like a perfectly adequate chlorine reading on a test strip while the chlorine itself is barely doing any sanitizing work because the water has drifted alkaline. This is a common reason people report “the chlorine isn’t working” even though they’re dosing correctly. A balanced pH, generally in the same comfortable range used for any residential pool, keeps chlorine’s sanitizing power where it should be. Baking soda, in small amounts, nudges pH upward if it’s tested too low; a small amount of pH-down product (widely sold at any pool supply aisle) nudges it back down if it’s drifted too high. Test strips that read both pH and chlorine in one strip make this a fast daily check rather than a separate chore.
Without circulation, pH can also vary more from one spot in the pool to another than it would in a pump-driven system, since nothing is actively mixing the water. Swishing the floating dispenser around and giving the water a stir with a pool brush periodically helps even this out, the same way stirring a drink distributes a mix-in rather than letting it settle to the bottom.

A locking floating dispenser prevents tablets from dissolving too fast and keeps chlorine levels steady between manual checks.
Check Price on AmazonWhen to Drain and Refill Instead
Manual cleaning has a ceiling. There’s a point, usually somewhere past a week of heavy use, where the most efficient move stops being “clean harder” and starts being “start over.” Recognizing that point early saves time compared to chasing cloudy water with more brushing and more chemicals after it’s already turned.
Signs You Can Keep Cleaning
- Water is still clear, just has visible floating debris
- A faint film on the liner that brushing removes easily
- Chlorine or pH test strips read within normal range
Signs It’s Time to Drain
- Water has a persistent musty or sour smell
- Visible green tint or stringy algae texture
- Liner feels slippery even right after brushing
If your pool has a drain plug, this is straightforward: remove the plug, let gravity do the work, then rinse the liner with a hose and a little mild soap before refilling. If there’s no plug, the same garden-hose siphon trick from earlier works for full drainage — just let it run longer and aim the outlet toward a slope or storm drain rather than your lawn, to avoid waterlogging the grass underneath. Full step-by-step coverage of fast draining lives in how to drain inflatable swimming pools quickly.
Before refilling, give the empty pool time to fully dry in direct sunlight. UV exposure is a genuinely effective, completely free disinfectant for the liner itself, and it dramatically reduces how fast the next fill turns cloudy.
There’s a cost-benefit angle here too, worth thinking through honestly rather than defaulting to whichever option feels less like work in the moment. Draining and refilling has an obvious water cost, and depending on local rates and any drought restrictions, that cost isn’t always trivial for larger pools refilled frequently. Manual cleaning has a time cost instead. For most households, the right balance lands somewhere in the middle — clean diligently enough to stretch each fill toward the longer end of its realistic lifespan, but don’t fight a losing battle past the point where draining is clearly faster and cheaper than continuing to chase a problem that’s already established. Treating both options as tools rather than picking one as a fixed philosophy tends to produce the best results over a full season.
Preventing Dirt Before It Starts
Every manual cleaning method above gets dramatically easier when there’s simply less to clean. Prevention is unglamorous, but it consistently outperforms even the best vacuum or skimmer technique, because removing a problem before it exists costs zero effort compared to removing it afterward.
Placement matters more than people think
Setting up under or near trees guarantees a steady drizzle of leaves, sap, and pollen no matter how often you skim. A patch of open lawn, ideally a short distance from flower beds and shrubs, cuts incoming debris dramatically before a single tool is involved. If you’re still deciding where the pool will live for the season, our guide on leveling ground for inflatable pools and the companion piece on what to put under inflatable pools both cover site selection in more depth.
Wind direction is also worth a moment’s thought, even though it’s easy to overlook. If your yard has a consistent prevailing wind during the part of the day the pool gets used most, positioning it on the downwind side of a fence, hedge, or the house itself can meaningfully cut how much loose debris blows directly across the water’s surface. This is a one-time setup decision that pays off every single day afterward.
A cover does more work than any single cleaning method
A simple tarp or a fitted pool cover blocks the majority of airborne debris and also slows sunlight-driven algae growth, since algae needs light as much as warmth to establish itself. Covering the pool between uses, especially overnight, is consistently the single highest-leverage habit in this entire guide.
Rinse off before getting in
Sunscreen, body oils, lotion, and just general yard dirt on skin and feet are major contributors to cloudy water and the slimy liner feeling people associate with neglected pools. A bucket of clean rinse water next to the pool, used before anyone climbs in, measurably reduces how often the rest of this guide’s methods need to be deployed. This habit takes about as long to explain as it does to actually do, which is exactly why it’s worth establishing as a household rule rather than an occasional suggestion — kids especially tend to follow whatever the consistent routine is, rather than whatever gets mentioned once.
Keep pets supervised separately
Pet fur, dander, and paw-tracked dirt add a surprising amount of debris and bacteria for their size. If pets are part of your routine, it’s worth reading whether inflatable pools are safe for dogs and considering a separate foldable pet swimming pool instead, which keeps your main pool’s water cleaner for longer between manual cleanings.

A properly sized cover often does more to keep water clean than any single cleaning tool on this page, simply by stopping debris before it lands.
Check Price on AmazonFor more cover options sorted by pool shape and size, see best covers for inflatable swimming pools.
Adjusting Methods by Pool Size and Type
Everything in this guide applies broadly, but the emphasis shifts depending on what kind of inflatable pool you’re actually maintaining. A toddler-sized kiddie pool and a large family-size inflatable behave differently enough that it’s worth calling out the differences directly.
Small kiddie pools (under 150 gallons)
These pools heat up fast, hold very little water, and are usually emptied and refilled more often than larger pools simply because doing so is fast and cheap relative to the volume involved. For pools this size, leaning toward frequent partial or full draining rather than heavy chemical use is often the more practical choice, especially with young children who shouldn’t be swimming in heavily chlorinated water anyway. Skimming and a quick rinse-down between uses typically handle the bulk of the maintenance load here.
Mid-size family pools (150–800 gallons)
This is the range where the full toolkit in this guide earns its place. Water volume is large enough that draining daily becomes wasteful and time-consuming, but small enough that manual methods still keep pace comfortably. A floating chlorine dispenser, a regular brush schedule, and weekly vacuuming form a sustainable routine for pools in this range.
Large inflatable pools (800+ gallons)
At this size, the case for at least a basic pump and filter system becomes stronger, since manual labor scales linearly with surface area and floor space while a pump’s effort doesn’t. That said, manual methods still work — they just demand more consistency. Brushing a larger floor area takes proportionally longer, and a single handheld vacuum charge may not cover the whole pool in one pass, so working in clearly defined zones (one quadrant at a time, for instance) keeps the task from feeling endless. If you’re shopping around at this size, it’s also worth comparing adult-oriented large inflatable pools directly, since liner thickness and shape both affect how easy manual cleaning ends up being.
Pools used by pets
Fur and dander clog skimmer mesh faster than typical debris and add an extra layer of organic material that accelerates bacterial growth. If pets regularly use the same pool as people, expect to brush and skim more frequently, and budget for shorter intervals between full drains. Many households find it easier to keep a separate, smaller pool specifically for pets — see best foldable pet swimming pools for options sized appropriately for that purpose.
A Realistic Cleaning Schedule
Rather than treating every method above as a one-time decision, the routines work best layered together on a simple cadence. Here’s a schedule that fits most households running a small-to-medium inflatable pool through a typical season.
| Frequency | Task | Method Used |
|---|---|---|
| Before every swim | Skim surface debris | Skimmer net |
| Daily | Check water clarity, swish chlorine dispenser | Visual check |
| Every 2–3 days | Brush walls and floor | Pool brush |
| Every 2–3 days | Test chlorine and pH | Test strips |
| Weekly | Vacuum settled sediment | Siphon hose or handheld vacuum |
| Every 7–14 days | Full drain, rinse, sun-dry, refill | Drain plug or siphon |
| Every use’s end | Cover the pool | Tarp or fitted cover |
This isn’t a rigid prescription — hot, sunny climates with heavy swimmer traffic will need to lean toward the more frequent end of every range, while a shaded pool used occasionally by one or two people can stretch toward the longer end comfortably.
Common Mistakes to Avoid
Overdosing chlorine in a small volume of water
It’s easy to assume “more is safer,” but small pools have far less water to dilute chemicals than people instinctively expect. Always dose based on actual gallons, not on habit carried over from a full-size pool.
Brushing without re-skimming afterward
Brushing loosens debris but doesn’t remove it. Skipping the follow-up skim just leaves that debris suspended, where it settles right back down within an hour.
Leaving the pool uncovered overnight
Overnight is when the bulk of airborne debris — and disproportionately, mosquito eggs — accumulates. A cover takes thirty seconds and prevents the majority of next-day cleaning work.
Ignoring a slippery liner
A slick feeling underfoot is usually an early algae film, not just “normal pool texture.” Treating it immediately with a brush pass is far easier than waiting until it visibly discolors the water.
Letting kids swim right after sunscreen application
Unabsorbed sunscreen rinses straight into the water and is one of the fastest ways to cloud a small pool. A 10–15 minute absorption window before swimming meaningfully reduces this.
Testing water only when something already looks wrong
Test strips are most useful as an early warning system, not a diagnostic tool for problems you can already see. Checking every two to three days, even when the water looks fine, catches pH or chlorine drift before it turns into a visible problem that takes longer to fix.
Using the same brush or net across multiple pools without rinsing
If a household maintains more than one pool — a kiddie pool and a pet pool, for instance — cross-contaminating tools between them can introduce algae spores or bacteria from one into the other. A quick hose-rinse of tools between pools takes seconds and avoids this entirely.
Troubleshooting Cloudy, Green, or Foamy Water
Even with a good routine in place, water occasionally goes wrong in a specific, recognizable way. Each symptom below points to a different cause, and treating the wrong cause wastes time without fixing the actual problem.
Cloudy but not colored
This is almost always fine particulate suspended in the water — dust, fine sand, or partially broken-down organic material that’s too small for a skimmer net to catch. The fix is mechanical, not chemical: a thorough brush-and-vacuum pass to pull suspended particles out, followed by giving the water time to settle if you can’t vacuum everything in one session. Baking soda can help here too, since shifting pH slightly can cause fine particles to clump together into something a net or vacuum can actually catch, a process pool professionals call flocculation on a larger scale.
Green tint
Green water means algae has established itself, not just floated through. By the time it’s visible, simply skimming won’t solve it — the algae is suspended throughout the water column, not sitting on the surface. A green tint calls for one of two responses: a full drain and refresh if the discoloration is significant, or an aggressive round of brushing combined with a chlorine shock dose if you want to try saving the existing water. Brushing matters even when the water itself looks green, because algae also clings to the liner and will simply reseed the water again if it’s not physically disturbed and removed.
White or grayish foam near the edges
Foam is typically a sign of residue from sunscreen, lotion, or low-quality bleach substitutes reacting with movement in the water. It’s more of a cosmetic nuisance than a health hazard, but it’s also avoidable. An oil-absorbing sponge run along the surface for a few minutes usually clears it within one session, and encouraging swimmers to rinse off before entering prevents it from returning as quickly.
A musty or sulfur-like smell
Contrary to common assumption, a strong chemical smell from pool water usually signals too little sanitizer relative to the organic material in the water, not too much. The smell comes from chlorine reacting with contaminants rather than from chlorine itself. If you’re using a floating dispenser, check whether the tablet has fully dissolved and needs replacing, and consider a shock dose to catch up if the smell is strong. If you’re going chemical-free, this smell is a fairly reliable signal that it’s time to drain and refresh rather than continue treating the existing water.
| Symptom | Likely Cause | First Response |
|---|---|---|
| Cloudy, no color change | Suspended fine particulate | Brush, vacuum, consider baking soda |
| Green tint | Established algae | Brush liner, shock dose or drain |
| Surface foam | Sunscreen / lotion residue | Oil-absorbing sponge |
| Musty smell | Low sanitizer relative to contaminants | Replace tablet, shock dose |
| Slick liner feel | Early biofilm or algae | Brush immediately |
Method Comparison Table
If you’re trying to decide where to focus your time and money, here’s how the three core manual methods stack up against each other directly.
| Method | Best For | Effort Level | Cost | Water Loss |
|---|---|---|---|---|
| Skim & Brush | Daily light maintenance | Low | $ | None |
| Garden Hose Siphon | Deep floor sediment | Medium | Free–$ | Some (refill needed) |
| Handheld Vacuum | Fast, frequent cleans | Low–Medium | $$ | None |
Most owners end up using all three in rotation rather than picking a single favorite: skim and brush daily, vacuum weekly, and reach for the siphon when sediment builds up faster than expected after a particularly dirty weekend.
If you’re still shopping for the pool itself, comparing options for adult-sized inflatable pools versus kid-focused inflatable pools, or weighing rectangular versus round shapes, can actually influence which cleaning methods will be easiest for your setup — rectangular corners, for instance, tend to trap more debris and benefit more from a dedicated brush routine.
Frequently Asked Questions
Can an inflatable pool actually stay clean without any pump at all?
Yes, for a meaningful stretch of time. With consistent skimming, brushing, and either chlorine tablets or frequent partial draining, most small and medium inflatable pools stay clear and swimmable for one to two weeks before a full refresh is the better option.
How often should I drain a pool that has no pump?
Most owners find every seven to fourteen days works well for moderate use, though kiddie pools used daily by young children often benefit from a full drain every two to three days since there’s no chemical sanitizing layer in many of those setups.
Is it safe to use chlorine in a pool without a filter system?
Yes, as long as it’s dosed appropriately for the pool’s actual water volume and distributed using a floating dispenser rather than dumped in all at once. Testing levels regularly with strips keeps things in a safe range.
What’s the fastest way to clean the bottom of an inflatable pool by hand?
A garden hose siphon vacuum is typically the fastest at lifting settled sediment, since it pulls debris continuously rather than requiring repeated scooping motions like a net would.
Can I use regular household bleach instead of pool chlorine?
Unscented household bleach is sometimes used as a substitute sanitizer in small pools, dosed carefully based on water volume, though purpose-made pool chlorine tablets are generally easier to dose accurately and consistently.
Why does my pool water turn cloudy even when I skim regularly?
Skimming only catches floating debris. Cloudiness is more often caused by fine particles suspended in the water itself, sunscreen residue, or an early pH imbalance, all of which need brushing, an oil-absorbing sponge, or a baking soda adjustment rather than skimming alone.
Do I need a filter cartridge if I’m cleaning manually?
No. Manual methods are designed specifically to replace what a filter cartridge would normally do, by physically removing debris through skimming, brushing, and vacuuming instead of straining it out continuously.
How do I keep mosquitoes from breeding in standing pool water?
Covering the pool when it’s not in use is the most effective single step, since it blocks egg-laying access entirely. Keeping a small amount of chlorine or frequently changing the water also disrupts the larval cycle.
Is a battery-powered handheld vacuum worth buying for a small pool?
For pools used frequently, it usually pays for itself in time saved compared to manual scooping. For occasional use, a simple skimmer and brush combo is often sufficient on its own.
Why is my pool liner slippery even after brushing?
This is usually an early-stage algae film rebuilding faster than your current cleaning frequency. Increasing brush frequency, adding a chlorine dispenser, or shortening the time between full drains typically resolves it. For a deeper prevention routine, see how to keep algae out of inflatable swimming pools.
Can I siphon pool water onto my lawn safely?
Plain or lightly chlorinated water at typical pool levels is generally fine for grass in moderation, though directing repeated siphoning to the same patch can cause waterlogging, so rotating the outlet spot or directing it toward a drain is a reasonable precaution.
How much water does a typical inflatable pool actually hold?
It varies widely by size, from under 100 gallons for a small kiddie pool to well over a thousand gallons for large family-size inflatables, which is exactly why dosing instructions for chemicals need to be matched to your specific pool rather than a generic rule of thumb. See how much water goes in inflatable swimming pools for size-specific estimates.
Final Thoughts: A Clean Pool Doesn’t Require a Pump
A pump is convenient, but it’s never been the only path to clean pool water — it’s just one tool among several that all accomplish the same two jobs: getting debris out, and keeping bacteria and algae from taking hold. Skimming, brushing, a garden hose siphon, a handheld vacuum, smart chlorine dosing, and a simple cover used consistently will outperform an unmaintained pump system every time.
Start small. A skimmer net and a brush, used before every swim, solve most of the problem on their own. Layer in the rest as your pool and your patience for upkeep make clear what’s actually needed.
Shop Manual Pool Cleaning Tools on AmazonStill deciding on the right pool before worrying about upkeep? Start with our complete guide to the best inflatable swimming pools, which links out to every size- and use-specific roundup we’ve put together, including our adult-focused picks and advice on heating an inflatable pool naturally and repairing small holes if your current pool needs a patch alongside its cleaning. Whichever combination of methods you settle into, the habit that matters most is consistency — a modest routine followed every day will always outperform an elaborate one followed every once in a while.