How to Level Ground for Inflatable Swimming Pools
The most overlooked step that protects your pool, your lawn, and everyone inside it. A complete, step-by-step leveling guide built for real backyards.
Why Leveling the Ground Is Non-Negotiable
You’ve ordered your pool. The packaging is open. The kids are already in their swimsuits. The last thing you want to do is spend an afternoon with a shovel. But here’s the reality: skipping ground leveling is the single most expensive shortcut you can take with an inflatable pool.
When the ground beneath your pool is uneven, water follows gravity. It migrates toward the low side, creating a progressively deeper pool on one end and an almost empty wall on the other. What happens next is predictable: the filled side of the pool wall bulges outward under the unbalanced water pressure, the seams stretch beyond their rated capacity, and in the worst cases — especially with larger inflatable swimming pools — the wall gives way entirely, sending hundreds or thousands of gallons of water rushing across your yard.
Beyond the structural risk, an unlevel pool is genuinely uncomfortable and potentially unsafe for swimmers. Children and pets lose their footing on the sloped floor. Adults sitting in an unlevel pool feel the constant pull toward one side. And for kids’ inflatable pools, even a small lean can tip a toddler unexpectedly.
Proper leveling also protects your investment from the ground up. Rough or rocky soil punctures pool liners. Buried roots slowly press into the vinyl over the season. Buried glass or wire can cause immediate and irreparable damage. Taking the time to level and prepare the ground — properly — extends the life of your pool by seasons, not just weeks.
The good news: leveling a backyard pool site is a half-day project at most for the average homeowner. You don’t need expensive equipment or professional skills. What you need is the right sequence of steps, and that’s exactly what this guide delivers.
How Level Is Level Enough for an Inflatable Pool?
This is the most practical question homeowners ask, and the answer has a real number attached to it. The industry standard — used by manufacturers and pool installers alike — is no more than 1 inch of variation across the entire pool footprint. For larger pools (over 15 feet in diameter), aim for under ½ inch.
| Pool Size | Max Acceptable Variation | Risk if Exceeded |
|---|---|---|
| Under 8 ft diameter | Up to 2 in | Mild lean, fast wear on low side |
| 8–12 ft diameter | 1 in max | Noticeable water shift, liner stress |
| 12–16 ft diameter | ½ in max | Seam bulge, structural instability |
| 16 ft+ diameter | ¼ in max | Collapse risk, severe injury potential |
One inch sounds tiny, but across a 15-foot pool, even a 1-inch lean puts dramatically unequal pressure on the liner and the inflatable ring walls. Think of it this way: if you pour water into a bowl that’s tilted even slightly, every drop migrates to the low side. Your pool works exactly the same way.

Get the Right Pool Ground Prep Supplies
From leveling sand to foam tile bases — shop everything you need to set up your inflatable pool safely.
Shop on Amazon →Tools & Materials You Need Before You Start
Most of the tools for leveling a pool site are common hardware-store items or things you probably already own. Gather everything before you start — stopping halfway through to make a hardware run derails your momentum and leaves the site half-prepared.
Optional but Helpful
- Laser level or rotary level (dramatically speeds up large pool leveling)
- Sod cutter (if removing a large grass area)
- Landscape fabric (prevents weed regrowth under sand layer)
- Pool ground cloth or foam tiles (for the protective base layer)
- Knee pads and gloves (you’ll be on the ground frequently)
If you’re planning on a semi-permanent setup, it’s worth reading our full guide on what to put under inflatable swimming pools — it covers every base material option in detail so you can choose the right protection for your specific liner and soil type.
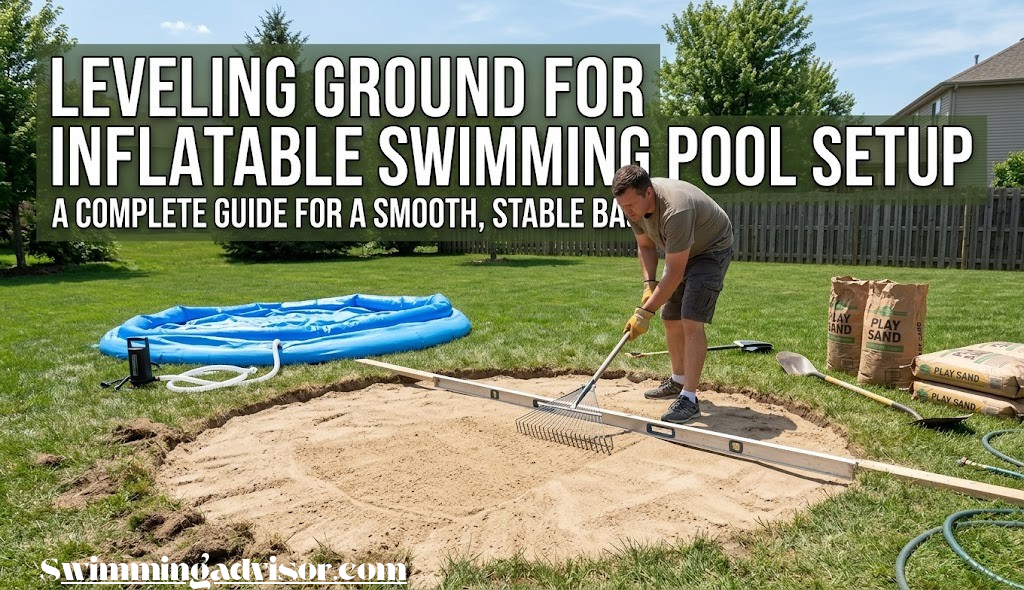
Step-by-Step: How to Level Ground for an Inflatable Pool
Follow these steps in order. Each builds on the one before it, and skipping any step creates a problem that shows up later — usually when the pool is full and harder to fix.
Choose the Right Location
Before you pick up a single tool, walk your yard with your pool’s dimensions in mind. Location selection is free and takes 10 minutes — but choosing the wrong spot means every subsequent step fights an uphill battle (sometimes literally).
Look for an area that is already relatively flat. Even if it needs some leveling, starting on a gentle grade is far easier than leveling a steep slope. Check the natural drainage pattern: water should flow away from the pool area, not toward it. A pool sitting in a low spot collects rainwater underneath, which leads to liner mildew, unstable soil, and mosquito breeding.
Measure out your pool’s full diameter plus an extra 2 feet on each side for safety clearance. Walk that perimeter and look down. Are there tree roots pushing up through the soil? Any buried sprinkler lines or irrigation equipment? Utility lines (always check before digging)? Large rocks or construction debris just under the surface? Any of these can cause problems later.
Clear the Site Thoroughly
With your location selected, it’s time for a thorough site clearing. This means removing everything from the pool footprint — and then some. Work from the center outward, extending your clearing at least 12 inches beyond the pool’s outer edge.
Remove all rocks, sticks, pinecones, and debris by hand first, then rake the entire area. Get down on your knees and run your hands across the soil surface. Anything that feels sharp, elevated, or firm that shouldn’t be there — a buried root fragment, a chunk of concrete, a wire — must come out. A single sharp object the size of a thumb tack can puncture a pool liner, and you won’t find it until the pool is full and deflating.
For pools that will sit for more than a few days, remove the grass too. Dying grass trapped under a pool liner creates a wet, airless environment that breeds mold and fungus. If you’re leaving the pool up for most of the season, consider spraying the area with a grass killer a week before setup, then raking out the dead vegetation before you begin leveling.

Flat Spades & Tampers for Pool Ground Prep
The right tools make short work of clearing and compacting. Shop highly-rated options on Amazon.
Shop Tools on Amazon →Mark and Measure the Pool Area
Once the site is clear, you need to define your working area precisely and find your high point — the spot from which all leveling decisions will be made. This step is where most DIY pool setups go wrong, because homeowners eyeball it instead of measuring.
Drive a stake into the center of your pool location. Using a tape measure set to the pool’s radius (half the diameter), mark the perimeter with additional stakes every 3–4 feet. Connect these stakes with mason’s string at a consistent height — roughly 3–4 inches above the ground surface. This string grid becomes your reference plane for the entire leveling operation.
Now clip a line level to the center of each string segment. Walk the perimeter checking each string section. Any area where the ground comes close to or touches the string is a high spot. Any area where the string is well above the ground is a low spot. Record which sections are high and by how much — this is your work plan.
The highest point you find becomes your grade reference. Every other spot in the pool area must come down to match that high point — not up. This is the golden rule of pool leveling: always cut down to the high point, never fill up to it. Filled soil compresses over time and causes the pool to settle unevenly mid-season.
Cut Down the High Spots
This is the labor-intensive part of the operation, but done correctly it sets up everything else to go smoothly. Using a flat-bladed spade (not a pointed digging spade), begin removing soil from your identified high spots, working toward your string reference line.
Work in thin layers — remove ½ inch at a time and re-check with your level after each pass. It’s tempting to take a big cut, but you’ll almost always overcut and then need to deal with a new low spot. Thin, controlled passes give you accuracy.
Move removed soil into a wheelbarrow and transport it away from the site — don’t pile it next to the pool area where it can migrate back or create drainage issues. As you work, periodically check your string lines to see how close the ground surface is getting to your target grade.
The one exception to this rule is using compacted, washed sand in small quantities to fine-tune a spot that’s just a half-inch too low after your cutting work is done. Sand can be precisely tamped and leveled for minor adjustments — loose topsoil cannot.
Compact and Settle the Soil
After cutting down high spots, the disturbed soil is loose and aerated. It has gaps between particles that will compact over time under the pool’s weight — meaning your carefully leveled surface will settle unevenly once the pool is full. Compacting now, before the pool goes down, eliminates this problem entirely.
Use a hand tamper — a flat, heavy plate on a handle — to pound the soil across the entire pool footprint. Work in overlapping passes, covering every square inch at least twice. For large pools (over 14 feet), rent a plate compactor from a local hardware store for a half-day. The vibrating plate compacts soil far more thoroughly than a hand tamper and is worth the small rental cost.
After compacting, water the surface lightly with a garden hose and let it sit for an hour. The moisture helps particles settle together. Then re-check your level strings — compaction sometimes reveals new high or low spots that weren’t visible before. If you find any, address them now with a spade before moving to the next step.

Hand Tampers & Plate Compactors
Proper compaction prevents mid-season settling. Browse the top-rated options for pool ground prep.
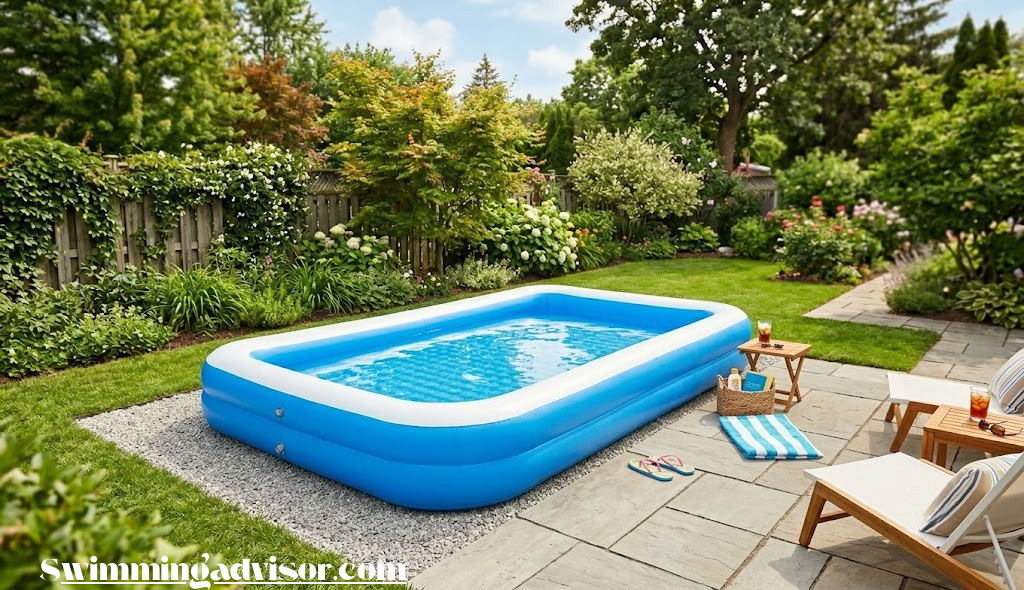
Shop Tampers on Amazon →Add a Protective Base Layer
Your ground is now level and compacted. The final prep step is adding a protective base layer between the soil and your pool liner. This layer serves three functions: it provides a final, ultra-smooth surface for the liner; it cushions the pool against any remaining micro-irregularities; and it protects against gradual punctures from small stones working their way up through the soil over time.
There are three popular base layer options, each with distinct advantages. Here’s how they compare:
| Base Material | Best For | Cushioning | Puncture Protection | Setup Ease |
|---|---|---|---|---|
| Washed sand (1 in) | Large permanent setups | ★★★★☆ | ★★★★★ | ★★★☆☆ |
| Pool ground cloth | Seasonal use, easy removal | ★★☆☆☆ | ★★★★☆ | ★★★★★ |
| Interlocking foam tiles | Portable, budget-friendly | ★★★★★ | ★★★☆☆ | ★★★★☆ |
If using sand, spread it evenly over the compacted soil and use a long, straight piece of lumber as a screed board to drag across the surface in multiple directions. This pulls excess sand from high spots and fills low spots, leaving a perfectly smooth and level surface. After screeding, avoid walking on the sand base — any footprints will need to be re-smoothed.
For more detailed guidance on base materials and their trade-offs, see our article on what to put under inflatable swimming pools. If you’ve chosen a foam tile base, see our related guide on the best inflatable swimming pools that match specific base types.

Pool Ground Cloths & Foam Tile Bases
Protect your liner and get a smooth, cushioned surface. Top-rated options ship fast from Amazon.
Shop Base Layers on Amazon →Final Level Check Before Setting Up
Before you unfold the pool, perform one final, comprehensive level check. This takes 10 minutes and confirms that your 1–3 hours of ground prep work has paid off. Never skip this step — it’s your last chance to make corrections without needing to move the pool.
Set a long spirit level (or a board with a level on top) across the pool diameter in at least four directions: north-south, east-west, and both diagonals. In each direction, the bubble should be centered in the level. Any persistent lean means a spot still needs addressing.
If your spirit level check passes in all four directions, you’re ready to set up your pool. If you find a spot that’s still off, address it now with a spade and light raking before re-checking. Once you’re satisfied, you’re done with ground prep — move on to inflating and filling your pool with confidence.
Leveling Methods Compared: Which Is Right for Your Situation?
Not every yard or pool size calls for the same approach. Here’s a direct comparison of the three most common methods homeowners use, matched to their best use cases.
Method 1: Cut-and-Grade (Best for Most Situations)
This is the method described in the step-by-step above — using a flat spade to cut down high spots to a level grade, then compacting. It’s the most structurally sound approach and the only one recommended for pools over 12 feet in diameter. The downside is physical effort, but the result is a stable, long-lasting pool pad that won’t shift during the season.
✔ Pros
- Most stable long-term
- Works for all pool sizes
- No settlement risk
- No extra materials needed
✗ Cons
- Physical labor required
- Leaves bare soil / lawn damage
- Needs compaction tools
Method 2: Sand Leveling (Best for Small to Mid-Size Pools)
For pools under 12 feet in diameter on surfaces that are close to level (within 1–2 inches), a compacted sand bed can serve as both the leveling layer and the protective base in one step. Spread 2–4 inches of washed sand, screed flat, and compact firmly. The limitation is that sand can only reliably compensate for minor terrain variations — using thick sand to bridge a major slope creates an unstable base that will shift.
✔ Pros
- Easier and faster than digging
- Dual function: levels and protects
- Great cushioning for liner
✗ Cons
- Only works for minor variations
- Can shift on slopes
- Extra material to purchase
Method 3: Foam or Rubber Tile Base (Best for Hard, Nearly Flat Surfaces)
Interlocking EVA foam tiles or rubber pavers can bridge very minor surface irregularities (under ½ inch) on hard surfaces like patios or concrete slabs. They don’t level the ground — they cover it with a cushioned layer that absorbs small differences. This method works well on back patios and is popular for adult inflatable pools on decking areas.
✔ Pros
- Fast and easy setup
- Great for hard surfaces
- Excellent cushioning
- Reusable season to season
✗ Cons
- Won’t correct real slope
- Not suitable for soft soil
- Tiles can shift over time
| Situation | Recommended Method |
|---|---|
| Grassy yard, pool over 15 ft | Cut-and-grade + sand base |
| Grassy yard, pool under 12 ft, minor slope | Cut-and-grade OR compacted sand bed |
| Concrete patio, nearly flat | Foam or rubber tiles |
| Gravel area, slightly uneven | Re-grade gravel + sand layer |
| Steep slope (over 3 in across pool) | Full cut-and-grade, consider retaining edge |
Browse Top-Rated Inflatable Pools
Now that your ground is ready, find the perfect pool. We’ve reviewed the best options across all sizes and uses.
Browse Our Top Picks →Common Pool Leveling Mistakes (And How to Avoid Them)
After understanding the correct process, it’s equally valuable to understand what goes wrong. These are the most common mistakes homeowners make — all of which are preventable.
Mistake 1: Eyeballing Instead of Measuring
Human eyes are surprisingly bad at detecting a half-inch slope across 15 feet. What looks flat almost never is. Always use a spirit level, line level, or laser level. The 10 minutes it takes to measure correctly saves hours of re-work later.
Mistake 2: Filling Low Spots with Loose Soil
This is the most damaging mistake. As explained above, loose fill soil compresses significantly under pool weight, creating mid-season settlement. If you must add material to a low spot, use compacted sand applied in thin layers — nothing else.
Mistake 3: Skipping Compaction
Even naturally firm soil that you’ve disturbed during leveling will settle. The act of cutting, raking, and moving soil loosens the particle bonds. Always compact after grading, even if you think the soil looks firm. A single afternoon with a tamper prevents months of problems.
Mistake 4: Ignoring the Drainage Direction
A pool site that is level in itself but positioned at the bottom of a slope will collect all the rainwater running off the hill behind it. This saturates the soil beneath the pool, causes the sand base to migrate, attracts insects, and creates an unstable foundation. Always check that surface water drains away from your pool, not toward it.
Mistake 5: Not Checking After Partial Fill
The final confirmation that your leveling was successful comes when the pool is filled to half depth. Check the water line against the pool wall from the side — it should be even. Many homeowners fill the pool completely before noticing a lean, making correction far more difficult. Build the half-fill check into your setup routine.
Mistake 6: Setting Up on Actively Wet Ground
If the ground is wet from recent rain, wait. Wet soil is significantly weaker than dry, compacted soil and will compress unevenly under pool weight. It also means any sand you add will shift. Let the site dry out for 24–48 hours after rain before setting up on freshly leveled ground.
If you have dogs that use the pool area, consider reading our guide on are inflatable swimming pools safe for dogs — pets can dig at the edges of a pool and disturb the ground base over time, requiring periodic re-leveling.
Keeping Your Setup Right All Season
Ground leveling is a one-time setup task, but your pool benefits from a few ongoing practices that keep the level stable and the pool clean throughout the season.
Checking Level Every 2–3 Weeks
After heavy rain, high temperatures, or extended pool use, give the water surface a quick visual level check. Look at the water line from pool-side. A new lean usually means the ground settled under a specific section — a problem that’s easy to fix early but difficult to ignore for long.
Managing Water Chemistry
Proper water chemistry extends the life of your liner and prevents damage that could force an early teardown and re-setup. Our guide to the chemicals needed for inflatable swimming pools walks through everything you need to keep water clean, safe, and liner-friendly.
Algae Prevention
Stagnant water in an improperly leveled pool creates dead zones where algae thrives. Keeping your pool level also helps circulation. For additional protection, read our guide on how to keep algae out of inflatable swimming pools.
Draining Without Damaging Your Lawn
When it’s time to take down the pool, draining it slowly and strategically protects the leveled pad you’ve created. A fast dump of water can erode the sand base and create new uneven spots. Learn the best technique in our guide on how to drain inflatable swimming pools quickly.
Heating, Covering, and Cleaning
A well-leveled pool is easier to maintain in every way. If you’re looking to extend your swim season, see our guide on how to heat inflatable swimming pools naturally. For off-season or overnight protection, browse our roundup of the best covers for inflatable swimming pools. And when it’s time to clean up without a pump, our guide on how to clean inflatable swimming pools without a pump has you covered.
Dealing With Punctures and Leaks
Proper ground preparation dramatically reduces the risk of punctures, but accidents happen. If you discover a hole, our guide on how to repair holes in inflatable swimming pools covers every repair method from vinyl patch kits to professional-grade adhesives.
For Families With Pets
Dog owners should explore our roundup of the best foldable pet swimming pools — designed with tougher materials that handle claws better than standard inflatables.

Pool Vacuums for Inflatable Pools
Keep your water crystal clear all season long. Shop the best-rated vacuums designed for inflatable pool liners.
See Pool Vacuum Reviews →Frequently Asked Questions
How level does ground need to be for an inflatable pool?
The ground should be within 1–2 inches of perfectly level across the entire pool footprint. More than 2 inches of unevenness can cause the pool to lean, the walls to bulge on one side, and water to concentrate unevenly — creating serious collapse risk for larger pools. For pools over 16 feet, aim for no more than ¼ inch of variation.
Can I put an inflatable pool on uneven ground?
No — setting an inflatable pool on uneven ground stresses the seams and walls on the low side, risks tipping, and causes rapid, uneven wear on the liner. Even small kids’ pools should be placed on level ground. Always level before setup, regardless of pool size.
How do I level ground for a pool without digging?
If digging isn’t an option, you can build up low areas using compacted sand — but only for very small height differences (under 1 inch). For larger differences, cutting down the high side is always more stable. Alternatively, use interlocking foam or rubber pavers that can bridge minor surface irregularities on hard surfaces.
What should I put under an inflatable pool for ground protection?
A layer of fine-grain sand (1 inch deep), a purpose-made pool ground cloth, or interlocking EVA foam tiles are the most popular options. Sand cushions the bottom, reduces puncture risk, and helps regulate temperature. See our full guide on what to put under inflatable swimming pools for a complete comparison of all base options.
Is sand or dirt better for leveling under an inflatable pool?
Washed, fine-grain sand is far superior to loose dirt. Sand is easier to grade precisely, compacts firmly, drains excess moisture, and provides a smooth, cushioning surface. Loose fill dirt can shift, settle unevenly, and harbor moisture beneath the pool liner over time.
Can I level the ground using just a rake?
A rake handles debris removal and rough grading well, but it won’t tell you if the ground is level — for that you need a spirit level or line level. Use the rake for clearing and loose soil distribution, then check with a level tool before compacting. Never skip the measuring step.
Do I need to remove grass before setting up an inflatable pool?
For temporary pools (under 7 days), short grass is usually fine. For pools that will sit for more than 7–10 days, remove or kill the grass first — dying, trapped vegetation creates moisture, mold, and mildew beneath the liner. It also damages your lawn far more severely if the pool sits on living grass for a full season.
How long does it take to level ground for an inflatable pool?
For a small pool (under 12 ft), allow 1–3 hours with basic hand tools. For a large pool (15–20 ft), plan on a half-day to a full day depending on terrain. Always allow extra time for the sand base to settle after light watering before you place the pool.
Can I use plywood or decking to level an inflatable pool?
Plywood or decking can work as a temporary platform for very small pools, but it must be structurally sound, dead flat, and rated for the water weight. The edges must never create a sharp pressure point under the liner. In most cases, properly leveled ground with a sand or foam base is safer and more practical for any pool over 8 feet.
How do I check if the ground is level for a pool without a level tool?
Fill a clear garden hose partially with water and hold both ends up — water settles at the same height at both ends regardless of distance. Hold one end at the ground at one side of the pool area and compare the water height at the other end. The difference in height tells you how much leveling is needed. This is called a water level, and it’s accurate to within ⅛ inch over any distance.
Conclusion: A Level Pool Is a Safe Pool
Ground leveling isn’t the exciting part of getting an inflatable pool ready. But of all the things you can do to protect your pool, your property, and the people who use it, it is the single most important. A properly leveled pad means a pool that fills evenly, wears evenly, and lasts for multiple seasons. It means you won’t come home to a yard full of escaped water and a collapsed vinyl shell. And it means the summer swim sessions that everyone is looking forward to can happen without interruption.
The process isn’t complicated once you break it down: choose the right location, clear it thoroughly, mark and measure, cut down your high spots, compact, add your base layer, and do one final level check. Seven steps that most homeowners can complete in a single afternoon. The tools are common, the method is straightforward, and the payoff is a season of worry-free pool time.
Whether you’re setting up a small splashing pool for the kids, browsing our picks for the best inflatable swimming pools for kids, or looking for something larger from our guide to the best inflatable swimming pools for adults, the ground under every pool deserves the same care. Level it right, and your pool will reward you all summer long.
Ready to Set Up the Perfect Pool?
Browse our complete reviews of the best inflatable swimming pools — matched by size, budget, and use case — to find the right pool for your newly leveled yard.
See Our Top Inflatable Pool Picks →Affiliate Disclosure: SwimmingAdvisor.com participates in the Amazon Services LLC Associates Program, an affiliate advertising program designed to provide a means for sites to earn advertising fees by advertising and linking to Amazon.com. When you purchase through links on this site, we may earn a small commission at no additional cost to you. All product recommendations are based on our own research and editorial standards.